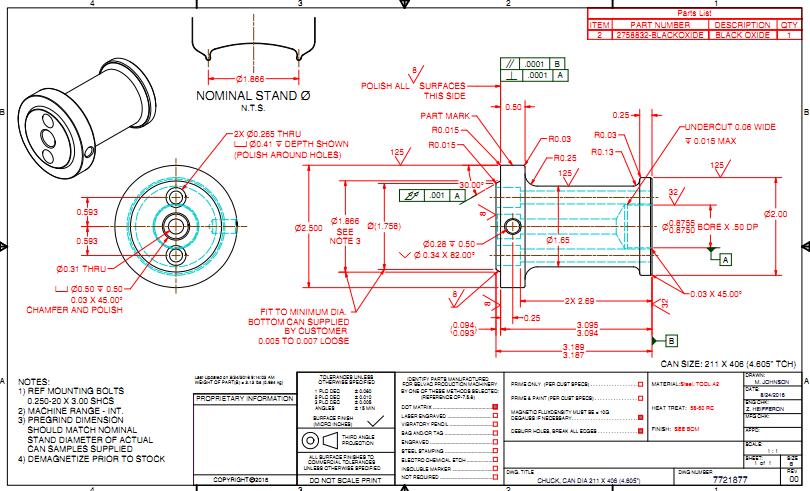
How to read machining drawing?
The purpose of reading machining drawing is to clarify the structural shape,size and technical requirements of the machined parts.So as to guide production and solve related technical problems, which requires engineers and technicians to have the ability to read machining drawings proficiently.
1. Basic requirements for reading part drawings
a. Know the name,purpose and material of the machined parts
b. Analyze the geometry,structural characteristics and functions of each components.
c. Analyze the shape size and the positioning size between the machined parts.
d. Familiar with the technical requirements of machined parts.
e. Preliminary determination of the manufacturing method of the machined parts.
2. Methods and steps for reading part drawings
a. General understanding.
Know the part’s name, material, scale, etc. from the title bar.
b. Detailed analysis.
b1. Analyze the view layout of the part drawing, to find out where the main view, other basic views and auxiliary views are located.
b2. Analyze the shape and figure out the structural shape of the machined part. This step is an important part of looking at the drawing. Start with the main view,connect with other views, and use the projection relationship for analysis.
b3. Analyze the dimensions.First find out the dimension datum in the three directions of length, width and height of the part, and then start from the datum to find out which are the main dimensions. Pay attention to check whether there are redundant dimensions and missing dimensions.
b4. Analyze the dimensional tolerances, geometric tolerances, surface roughness and other technical requirements of the machined parts.
When we read the drawing, for the more complex machined part, it is often necessary to refer to the relevant technical data,such as assembly drawings, part drawings and manuals of related parts,etc.


